
ON SITE STUD SHEAR SYSTEM

 |
ON SITE STUD SHEAR SYSTEM |
 |
DRYWALL CONSTRUCTION
Instructional Guide, Tips and Hints
Drywall construction techniques are discussed in detail in the following page. For more info on drywall construction, go to: www.usgaction.com/HANDBOOK
In cold weather during joint finishing, temperatures within the building should be maintained within the range of 55° to 70°F. (13° to 21°C) and adequate ventilation should be provided. Also see "Quality Drywall Finishing in All Kinds of Weather," U.S. Gypsum Company folder J-75.
Gypsum panels must be firmly fastened to framing members without cutting the surface paper or fracturing the core. Make certain panel joints are aligned. When one panel is higher than another it becomes difficult to leave sufficient compound under the tape covering the high panel. Blisters, bond failure and cracks can easily develop in these areas.
Open spaces between panels of 1/4" or more should be filled with compound at least 24 hours prior to embedding or first-coat work. SHEETROCK Setting-Type (DURABOND) and SHEETROCK Lightweight Setting-Type (Easy Sand) Joint Compounds, which are hardening types, are recommended for these large fills. With these setting-type compounds as a fill, joint treatment may begin as soon as the compound has hardened, eliminating the typical 24-hr. drying period. Good planning prior to hanging panels eliminates unnecessary joints.
Applicators must keep tools and equipment clean and in good repair to secure satisfactory results. With mechanical tools, parts must be replaced as soon as they show signs of wear.
Mixing joint compounds in dirty buckets or failure to wipe down bucket as material is used causes lumps, scratches and usually creates hard working material. With setting-type materials such as SHEETROCK Setting-Type (DURABOND) and SHEETROCK Lightweight Setting-Type (Easy Sand) Joint Compounds, a residue of dry compounds will shorten setting time of the new batch.
The hardening action of SHEETROCK Setting-Type (DURABOND) and SHEETROCK Lightweight Setting-Type (Easy Sand) Joint Compounds requires that all tools, mixing containers, bread pans, etc., used for application be thoroughly cleaned. Flush and clean these compounds from equipment with a conventional garden hose and brush before the setting action takes place. Immersion of equipment in water will not prevent hardening of the compound.
Mechanical tool application is not recommended with fast-setting SHEETROCK Setting-Type (DURABOND) and SHEETROCK Lightweight Setting-Type (Easy Sand) Joint Compounds.
Mixing Joint Compounds
Hand Tool Application
Mechanical Tool Application
Setting-Type Joint Compound Application
Drying Time--Joint Compound Under Tape
Finishing
Use cool to lukewarm (not hot) water. If compound should accidentally be overthinned, simply add additional Ready-Mixed Compound to thicken, then remix.
To hold the wet mix in a container for prolonged periods, cover the material with a wet cloth or a thin layer of water. When needed, pour off water and retemper as necessary.
Ready-Mixed Compound is sensitive to cold weather and must be protected from freezing. If material freezes in container, allow it to thaw at room temperature (do not force the thawing process). Usually it will again be usable, unless it has been subjected to several freeze-thaw cycles. Ready-Mixed Compound can be used in tools and containers previously used for powder compound after normal cleaning.
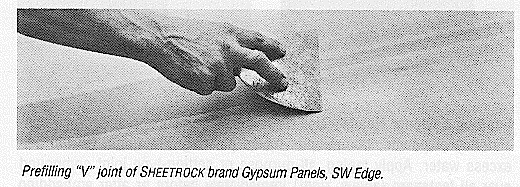
Prefilling Joints -- This step is necessary with SW Edge board only. Fill the "V" groove between SHEETROCK brand Gypsum Panels, SW Edge with SHEETROCK Setting-Type (DURABOND 45 or 90) or SHEETROCK Lightweight Setting-Type (Easy Sand 45 or 90) Joint Compound. Apply compound directly over "V" groove with a flexible 5" or 6" joint finishing knife. Wipe off excess compound that is applied beyond the groove. Allow fill compound to harden.
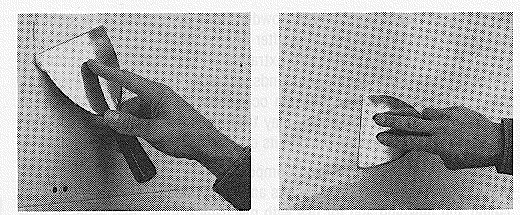
Embedding Tape -- Drive home all fasteners that protrude above the gypsum panel surface. Using a broad steel finishing knife, apply a continuous coat of taping, all-purpose or setting-type joint compound to fill the channel formed by the tapered edges of the panels (above, left). Center and lightly press SHEETROCK Joint Tape into fresh joint compound. Working within a convenient arms-reach area, embed tape by holding knife at an angle to panel. Draw knife along joint with sufficient pressure to remove excess compound above and below tape and at edges (above, right). Leave sufficient compound under tape for proper bond but not over 1/32" under edge. While embedding, apply a thin coat of joint compound over the tape (below, left). This thin coat reduces edge wrinkling or curling and makes the tape easier to conceal with following coats. Allow to dry completely. (See drying time guide.) Do not use topping compound for embedding tape.
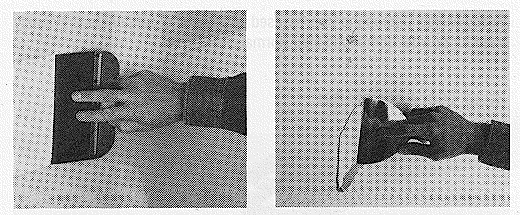
Spotting Fastener Heads -- Use ready-mixed compounds at package consistency or powder compounds mixed per bag directions. Do not add excess water. Apply taping, all-purpose or setting-type joint compound over all fasteners (above, right) immediately before or after embedding tape. Fill only the fastener depression. Apply enough pressure on knife to level compound with panel surface. Allow each coat to dry. Repeat application until fastener depressions are flush with panel surface.
Filling Beads -- Use ready-mixed compounds at package consistency or powder compounds mixed per bag directions. Apply all-purpose or setting-type compound at least 6" wide over all corner beads (next page, top) and to trims that are to receive compound. Allow each coat to dry. Apply following coats approximately 2" wider than preceding coats. For smoother finishing, the final coat of joint compound may be thinned slightly.
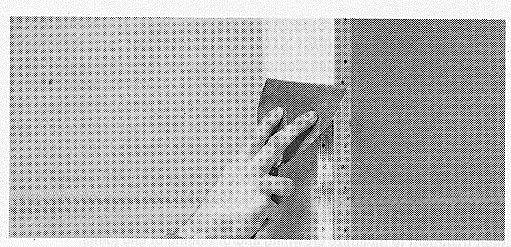
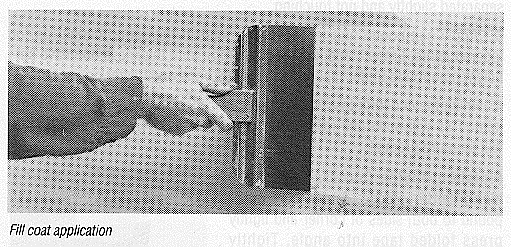
Fill Coat Application -- After the tape embedding coat is dry, apply a topping or all-purpose compound fill (second) coat approx. 7" to 10" wide over taped joints (shown below), beads and trim. Feather edge of second coat approx. 2" beyond edge of first coat. Spot fasteners with second coat. Allow to dry.
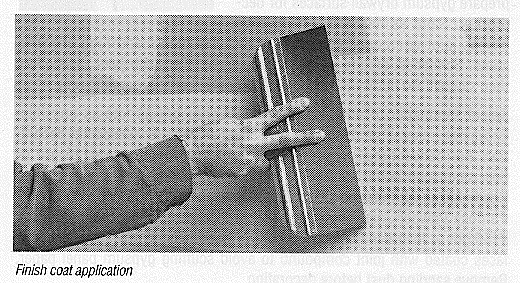
Finish Coat Application -- After second coat is dry, smooth tool marks and other protrusions with a finishing knife. Apply a thin finish (third) coat of ready-mixed topping or all-purpose compound over joints, fasteners, beads and trim. Finish compound may be applied at a slightly thinner consistency. Feather edges of third coats at least 2" wider than second coats (shown below). SHEETROCK Lightweight All Purpose (Plus 3) Joint Compound¾Ready-Mixed, SHEETROCK Setting-Type (DURABOND) or Lightweight Setting-Type (Easy Sand) Joint Compounds, and SHEETROCK Lightweight All Purpose Joint Compound¾Powder (AP Lite), require only two coats over metal corner beads and fasteners. Joints, fasteners, beads and trim should be finished as smooth as possible to minimize sanding. Go over the whole job to smooth and touch up with joint compound all scratches, craters, nicks and other imperfections in the dried finish coat.
End (Butt) Joints -- Because ends of gypsum panels are flat and have no taper, end joints are difficult to conceal. Also, exposed paper on ends may cause visible ridging or beading. The following steps are recommended for joint treatment to minimize crowning and/or ridging of end joints:
| Finishing Inside Corners -- Fold tape along center crease. Apply joint compound to both sides of corner and lightly press folded tape into angle. Tightly embed tape into both sides of angle with finishing knife (at right). Let dry. Next, apply a thin finish coat to one side of angle only. Allow to dry and apply finish coat to other side of angle. | 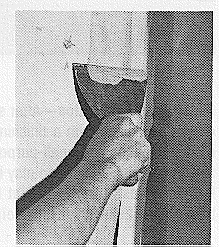 |
Dry Sanding -- Sand joint compounds to prepare gypsum drywall surfaces for decoration. Sand as necessary to remove excess joint compound from tool marks, lap marks and high crowned joints. Scratches, craters and nicks should be filled with joint compound, then sanded. Do not try to remove these depressions by sanding only.
Select sandpaper or abrasive-mesh cloth with grit as fine as possible. Excessively coarse sandpapers leave scratches that are visible after decoration. For conventional weight all-purpose compounds, use #120 grit or finer sandpaper (#200 grit or finer mesh cloth). For SHEETROCK Lightweight Ready-Mixed All Purpose (Plus 3) Compound, SHEETROCK Lightweight All Purpose Powder Joint Compound (AP Lite) and topping compounds, use #150 grit or finer sandpaper (#220 grit or finer mesh cloth). Only sand surfaces coated with joint compound to avoid scuffing gypsum panel paper. Remove sanding dust before decorating. Ventilate or use a dust collector to reduce dust in work areas. Use a NIOSH-approved respirator specified for mica and talc when air is dusty. Use of safety glasses is recommended.
Wet Sanding -- Wet sanding or sponging finished joints, trim and fasteners is recommended rather than dry sanding to avoid creating dust. The best material to use for wet sanding is a high density, small celled, polyurethane sponge. This type of sponge material resembles high quality carpet padding. When only a touch-up is required, a general purpose sponge or smooth, soft cloth will work.
To wet sand , saturate the sponge with clean water containing no soap or additives. Water temperature should be cool to lukewarm, not hot. Wring out sponge only enough to eliminate dripping. To remove high spots, gently rub joints in a direction parallel to the joint compound surface; do not rub down into the joint compound. Use as few strokes as possible. Excessive rubbing will groove joints. Clean sponge frequently.
Several types of mechanical and semi-mechanical tools are available. Tools used in the following sequence illustrate typical procedures.
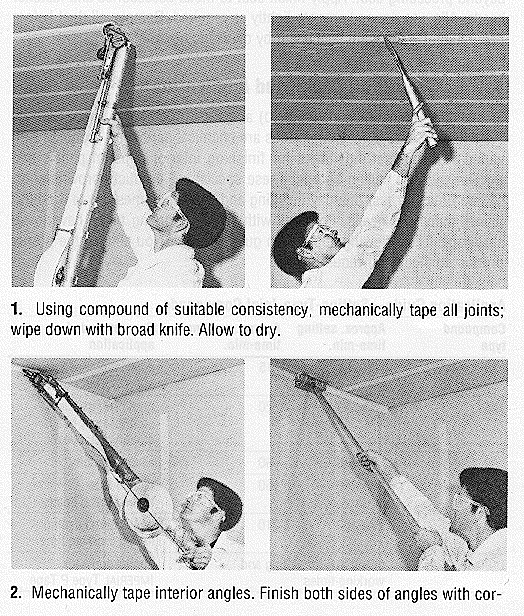
1. Using compound of suitable consistency, mechanically tape all joints; wipe down with broad knife. Allow to dry.
2. Mechanically tape interior angles. Finish both sides of angles with corner roller and corner finisher as shown above. Touch up with broad knife as necessary. Apply first coat to fastener heads and metal accessories. Allow to dry,
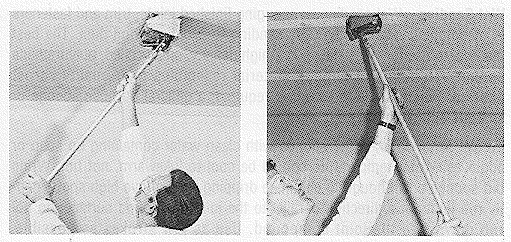
3. Apply fill coat of compound over tape on flat joints using hand finisher tool. Using compound of thicker consistency, spot fastener heads and apply second coat to metal accessories. Allow to dry.
4. Apply finish coat of compound to flat joints, feathering edges about 2" beyond preceding coat. Apply finish coat to metal accessories and fastener heads. Allow to dry and smooth lightly as required. Remove all dust before decoration. Do not scuff face paper by oversanding.
SHEETROCK Setting-Type (DURABOND) and SHEETROCK Lightweight Setting-Type (Easy Sand) Joint Compounds are chemical hardening products with varied working (setting) times for finishing interior gypsum panels and exterior gypsum ceiling boards. These specialized products provide short setting times for fast one-day finishing and extended times (up to 6 hours) to suit individual needs. Products with shorter working times have lower shrinkage. The following application guide will help you choose the proper product to meet your requirements.
| Compound type | Approx. setting time-min. |
Approx. working time-min. |
Recommended Application |
| 20 | 20-30 | 15 | application needing very short working time |
| 45 | 30-80 | 20 | prefill SW panels, spot fastener heads, embed metal beads |
| 90 | 85-130 | 60 | all applications |
| 210 | 180-240 | 150 | embed tape, embed metal beads |
| 300 | 240-360 | 210 | application needing longer working time |
| DURABOND LC | check bag for setting and working times. | application with IMPERIAL Type P Tape | |
For One-Day Finishing -- Use the techniques shown for hand application; mechanical tool application is not recommended for SHEETROCK Setting-Type (DURABOND) and SHEETROCK Lightweight Setting-Type (Easy Sand) Joint Compounds because these compounds may harden in the tools, making them inoperable. In the following sequence, Steps 1 through 4 must be completed by mid-day. Planning and scheduling according to the setting times of the compounds is essential.
>/font>(Where SHEETROCK brand Gypsum Panels, SW Edge, are used, the first step is to fill the "V" grooves between panels.)
For SHEETROCK brand Exterior Gypsum Ceiling Board Surfaces -- Use hand application techniques and a SHEETROCK Setting-Type (DURABOND) or SHEETROCK Lightweight Setting-Type (Easy Sand) Joint Compound to treat joints and fasteners in SHEETROCK brand Exterior Gypsum Ceiling Board applications. During periods of near-freezing temperatures, check weather forecast before beginning work. Minimum air, water, mix and surface temperatures of 45°F (7°C) must be ensured until compound is completely dry. Apply SHEETROCK Setting-Type (DURABOND) or SHEETROCK Lightweight Setting-Type (Easy Sand) Joint Compound in the following sequence:
For Use with SHEETROCK brand Gypsum Panels, Water-Resistant -- In areas to be tiled, for tapered edge joints, embed SHEETROCK Joint Tape with SHEETROCK Setting-Type (DURABOND 45 or 90) or SHEETROCK Lightweight Setting-Type (Easy Sand 45 or 90) Joint Compound. When set, apply a fill coat of the same joint compound. Take care not to crown the joint. Wipe excess joint compound from the water-resistant panel surface before it sets. For butt joints and interior angles, embed SHEETROCK Joint Tape with SHEETROCK Setting-Type (DURABOND) or SHEETROCK Lightweight Setting-Type (Easy Sand) Joint Compound. A fill coat is not necessary. Again, take care not to crown the joint. For fasteners, spot fastener heads at least once with setting-type joint compound.
Fill and seal all openings around pipes, fittings and fixtures with a thinned down coat of a good quality tile adhesive. For best results, use tile adhesive both as a sealer and to set the tile. Thin to a paint-like viscosity and apply the thinned compound with a small brush onto the raw gypsum panel core at the cutouts and allow areas to dry thoroughly prior to application of tile. Before adhesive dries, wipe excess material from the surface of gypsum panels.
For areas not to be tiled, embed tape with SHEETROCK Setting-Type (DURABOND) or SHEETROCK Lightweight Setting-Type (Easy Sand) Joint Compound 45 or 90 in the conventional manner. Finish with at least two coats of a U.S. Gypsum Company joint compound to provide joint finishing for painting and wall papering.
This standard is based on evaporation of 10 lb. water per 250 ft. paper tape, corresponding to 1/16" to 5/64" wet compound thickness under the tape.
| RH | RH = Relative Humidity | D = Days (24.Hr.) | H = Hours | |||||
| 98% | 53 D | 38 D | 26 D | 18 D | 12 D | 9 D | 6 D | 4½ D |
| 97% | 37 D | 26 D | 18 D | 12 D | 9 D | 6 D | 4½ D | 3¼ D |
| 96% | 28 D | 21 D | 14 D | 10 D | 7 D | 5 D | 3½ D | 2½ D |
| 95% | 25 D | 17 D | 12 D | 8 D | 6 D | 4 D | 2¾ D | 2 D |
| 94% | 20 D | 14 D | 10 D | 7 D | 5 D | 3¼ D | 2¼ D | 41 H |
| 93% | 18 D | 12½ D | 9 D | 6 D | 4 D | 2¾ D | 2 D | 36 H |
| 92% | 15 D | 11 D | 8 D | 5 D | 3½ D | 2½ D | 44 H | 32 H |
| 91% | 14 D | 10 D | 7 D | 4¾ D | 3¼ D | 2¼ D | 40 H | 29 H |
| 90% | 13 D | 9 D | 6 D | 4½ D | 3 D | 49 H | 36 H | 26 H |
| 85% | 10 D | 6 D | 4 D | 3 D | 2 D | 34 H | 25 H | 18 H |
| 80% | 7 D | 4¾ D | 3¼ D | 2¼ D | 38 H | 27 H | 19 H | 14 H |
| 70% | 4½ D | 3½ D | 2¼ D | 38 H | 26 H | 29 H | 14 H | 10 H |
| 60% | 3½ D | 2½ D | 42 H | 29 H | 20 H | 14 H | 10 H | 8 H |
| 50% | 3 D | 2 D | 36 H | 24 H | 17 H | 12 H | 9 H | 6 H |
| 40% | 2½ D | 44 H | 29 H | 20 H | 14 H | 10 H | 7 H | 5 H |
| 30% | 2¼ D | 38 H | 26 H | 18 H | 12 H | 9 H | 6 H | 4½ H |
| 20% | 2 D | 34 H | 23 H | 16 H | 11 H | 8 H | 5½ H | 4 H |
| 10% | 42 H | 30 H | 21 H | 14 H | 10 H | 7 H | 5 H | 3½ H |
| 0 | 38 H | 28 H | 19 H | 13 H | 9 H | 6 H | 4½ H | 3 H |
| ºF | 32º | 40º | 50º | 60º | 70º | 80º | 90º | 100º |
| ºC | 0º | 4º | 10º | 16º | 21º | 27º | 32º | 38º |
The drying times for thicker (or thinner) coats of wet compound between tape and panels will increase (or decrease) in proportion to the wet compound thickness.
The drying times shown in the chart apply when the exposed surface of tape is bare or nearly bare, and when adequate ventilation is provided. A heavy compound coat over tape lengthens drying time.
Gypsum drywall provides smooth surfaces that readily accept paint, texture finishes and wallcoverings. For satisfactory finishing results, care must be taken to prepare surfaces properly to eliminate possible decorating problems commonly referred to as "joint banding" and "photographing." These problems are usually caused by differences between the porosities and surface textures of the gypsum panel face paper and the finished joint compound, and magnified by the use of gloss paints. Then, when viewed in direct natural lighting, the joints and fasteners in painted walls and ceilings may be visible.
Skim Coating
The best method to prepare any gypsum drywall surface for painting is to apply a skim coat of joint compound. This leaves a film thick enough to fill imperfections in the joint work, smooth the paper texture and provide a uniform surface for decorating. Skim coating is currently recommended in the industry when gloss paints are used. It is also the best technique to use when decorating with flat paints.
Skim Coat Application
Finish joints and fasteners in the conventional three-coat manner. After joints are dry, mix joint compound¾preferably SHEETROCK All Purpose, SHEETROCK Lightweight All Purpose (Plus 3) Ready Mixed or Cover Coat Compound¾to a consistency approximating that used for hand taping. Using a trowel, broad knife, or long-nap texture roller, apply only sufficient amounts of joint compound to cover the drywall surface. Then immediately wipe the compound as tightly as possible over the panel surface using a trowel or broad knife.
Finishing and Decorating Tips
For more on this subject go to the USG Handbook site at: www.usgaction.com/HANDBOOK

